Deviation Actions


Description
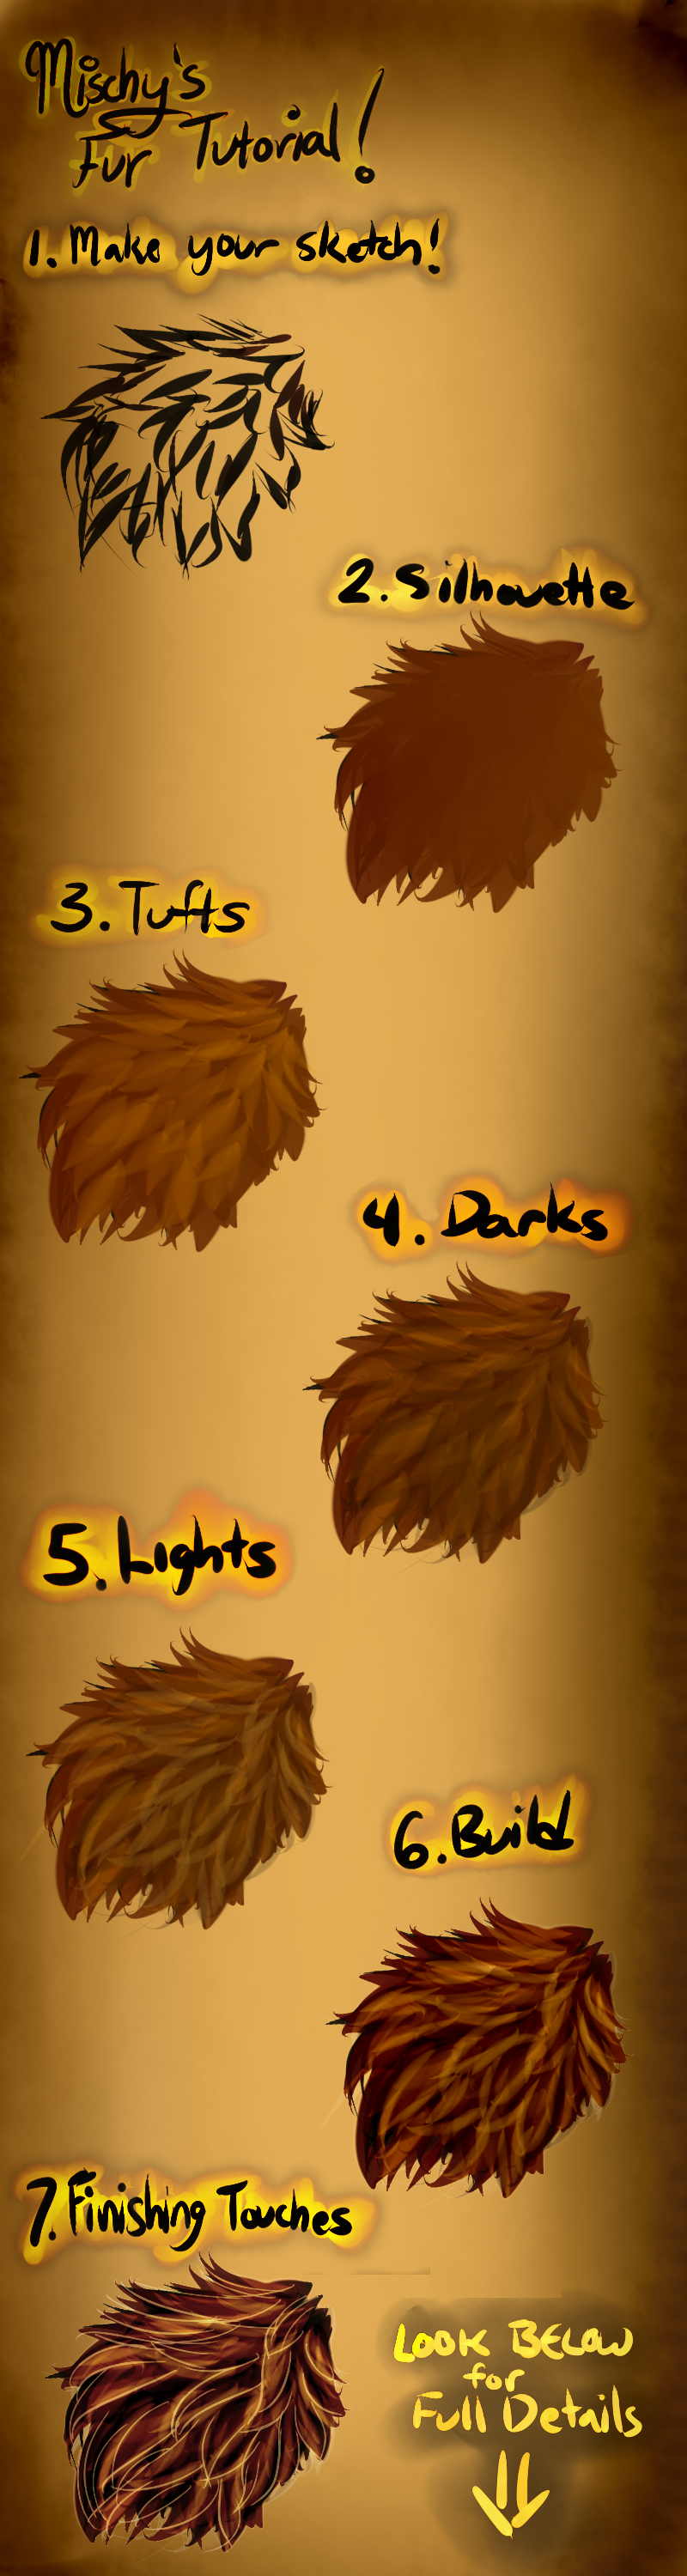
MischievousRaven’s Fur Tutorial
Finally got around to making this! I’ve had many people contact me asking me how I do fur/if I could put up a tutorial, so I hope this helps answer said inquiries! ^-^ This was made on Paint Tool SAI. Below I’ve outlined the “steps” further along with hints/things I’ve found out by a lot of trial and error. I am in no way a fur guru, and my style is rather.. sketchy/crazy, so I’m sorry if this doesn’t work for you. ![]() I hope this helps you!
I hope this helps you!
1. Make Your Sketch!
I’ve come to learn that you really want your anatomy/posture/position to be figured out when you make the sketch of your character. It is very hard to change this later on when you have lots of fur layers over your sketch that are already created to the mold of your original sketch. So, be sure to get your anatomy and position to your liking in your sketch! I used to skimp on this part, and I paid for it later—oversized paws, awkwardly-placed legs, odd-lengthed spines, etc.! Also, don’t be afraid to be messy! Sketch out not only the anatomical position of your character, but also the way you want the fur to fall—does it fall longer and more whispy along the neck, and clumps up around the hind end? Do you want tapering along the legs? All this can be figured out via sketching! So don’t be afraid to make a mess and draw bold—your sketch won’t be seen anyway. J
2. Silhouette
I’m a bit different from other fur artists, in the respect that I DON’T draw a clean lineart and fill in the lines with color (typically). What I do is I create a new layer that sits on top of my sketch, and I create an opaque silhouette of what I’ve drawn by using a slightly darker hue than the general fur color I’m wanting to use. I use the rough sketch below as a guide, and I use small strokes to begin the placement of my fur silhouette! I sometimes alter the color a –bit- throughout the silhouette, (from darker to lighter) if I’m planning on the light to hit from a certain direction. It may be beneficial to bring down the opacity of the sketch layer to a duller grey, especially if the fur color you’re using for the silhouette is a similar color to your sketch lines.
3. Tufts
Now, create a new layer on top of your silhouette layer. Take a lighter hue of the color you created the silhouette with, turn down the opacity of your brush, and define the general area of your fur tufts on top of the silhouette layer. Once you’ve created the general lighter fur tufts layer on top of your silhouette layer, you can mess with the opacity of the layer to figure out how soft or defined you want the tufts to be. I generally keep my general fur tuft layer fairly low on the opacity level, as I know I’ll be defining this later. Again, it is best to use short strokes to create the texture of the fur. Don’t be afraid to tilt your canvas to get the fur angled juuuust the way you like!
4. Darks
Now, you can combine your silhouette layer and your general lighter fur tuft layer. Time to create a whole new layer on top of that! On this new layer, take an even darker hue and again, turn down the opacity of your brush. Messily around each tuft, darken up the area to better define it; also, add more darks to the shadowed areas of the body—under the elbow/along the stomach/ribcage, at the base of the hip, where the light doesn’t hit exactly on the legs, under the brow of the eyes, and so on. The opacity of the layer can also be fluctuated so that your darker hues are more defined or more subtle. Don’t be afraid to be messy, as shadows and darkening hues along a canine’s body aren’t perfectly defined. C:
5. Lights
New layer again! On top of everything! Take a lighter hue and, with a bit of higher opacity with the brush (and again, don’t be afraid to mess with the opacity of the layer) subtly define the outer (“v” like) edges of the tufts—again, don’t be afraid to be messy! Try to keep the lighter hues away from the area of the fur that would be closer/connected to the skin/underneath other tufts, as this area is where shadows/darker hues should be. The lighter hues are going to be found on the ends of the fur follicles that are furthest away from the body, and the parts of the tufts that aren’t hidden under other tufts, if that makes sense.
6. Build
More layers omg! Now that you’ve got the basic tufts/lights/darks/shadows/color of your fur going on, it’s time to define it! Basically what I do is I work with each end of the spectrum—I layer up the darks of the fur by making the brush smaller/more defined and adding more opacity with each size down I go (so that there is not so much in the image that is –truly- jet opaque black, and more varying smoky hues that blend across the spectrum) And I do the same with the lights as well—with each size down in the brush, I bump up the opacity and even make the brush an even lighter shade, until I have bits of off-white/white in my image that are well blended with a lot of varying shades between this white/offwhite highlights and the true color of the fur. By building up the varying darks and lights, you’ll notice there will be a lot of layers, but don’t worry, it’s all worth it!
7. Finishing touches
This is pretty simple—just add any finishing touches you need to your image! I usually go back and add a few more extra-white-hot highlights to the edges of my tufts, brighten up my colors by utilizing the contrast and saturation tools that Paint Tool SAI offers, and sometimes I find myself messing around with the brightness and darkness of the fur as well. You’ll find it best to combine all of your fur layers into one at this point, as making these alterations are easiest/look best when you have all your layers together on one. J
I hope this tutorial has helped you; thanks for reading! ;-; <3
I always have difficulty to paint fur. Especially the fluffy one.
Do you have any special setting for the brush in paintoolSAI to create this fur?
Thank youuu~!!